Minecraft Cartographer Mod [1.6.2/1.6.1/1.5.2/1.5.1/1.4.7]
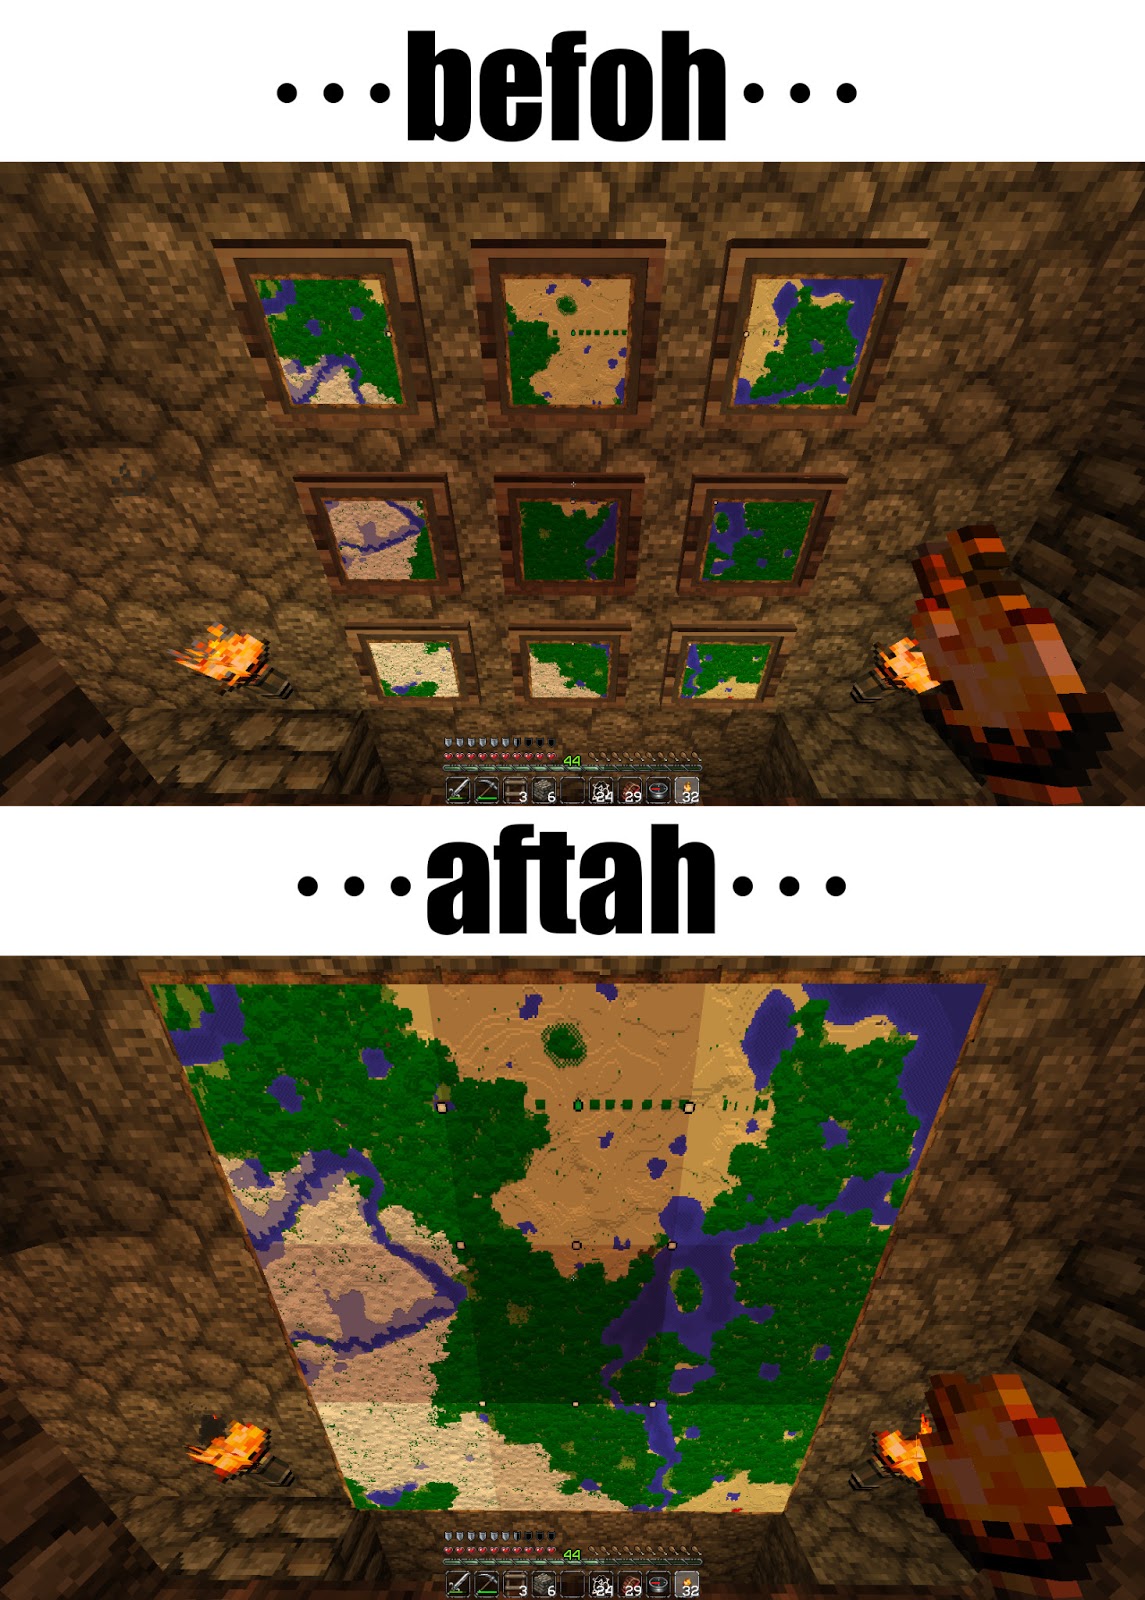
Minecraft Mods — July 27, 2013, 3:08 PM - 896 ViewsEver wanted to be a cartographer, but your mom didn’t let you? Now you can! ‘Cartographer’ lets you place your maps on Item Frames as you’d usually do, but with the slight difference that they will be as big as a block instead of small as the Item Frame.
Original example:

Better example of what this mod does:
I was using Glowstone before figuring out the method below

Tips on how to get the whole map well lit:
Given that the center of the map will not be near any light source (unless you put it right in front of it), it will get really dark at night or beneath a ceiling.
To avoid this, you can use Redstone Lamps/Jack’O Lanterns/Glowstone to put them behind the Item Frame. Every Redstone Lamp/Jack’O Lantern/Glowstone will illuminate perfectly the 4 blocks around it in a cross (+) shape.
How to install Cartographer Mod for Minecraft 1.6.2:
Installation for MC 1.6.1 and newer
- Enter your .minecraft folder as you always do.
- Enter “.minecraft\versions\” folder.
- Copy the folder of the version you wish to apply the mod to.
- Paste it in the same folder.
- Rename the folder to whatever you want. For this example, I’ll use “1.6.1 Mods”.
- Inside the folder, rename the JAR and JSON files to the same name you gave to the folder: “1.6.1 Mods.JAR” and “1.6.1 Mods.JSON”, respectively.
— If there’s a “natives” folder, close the game and the launcher. - Open the JSON file with Notepad (Or your favorite text editor).
- In the first line, there’s something like “id”: “1.6.1″ (It’ll change depending on the version).
— Change it to the same as the name given to the folder and files: “id”: “1.6.1 – Mods”. - Extract the content of the mod’s ZIP file to the “1.6.1 Mods.JAR” file.
- Delete META-INF folder.
- Open the launcher.
- Create a new profile.
- Name it to whatever you like.
- Select “1.6.1 Mods” where you select the version.
- Save the profile.
- In the profile list, select the one that says “1.6.1 Mods”.
Installation for Minecraft 1.6.2 with Forge
A. Easy
- - Use the official launcher to download and start once Minecraft 1.6.2.
- - Use the Forge installer to install Forge
- - Use the official launcher to start once Minecraft with the Forge profile.
- - Start Magic Launcher
- - Click “Setup”
- - Select Environment “Forge9.10.X.Y”
- - Click “Add” -> select the Cartographer ZIP file
- - Click “Advanced”
- - In the field “Parameters” add “-Dfml.ignorePatchDiscrepancies=true”
- - Click “OK”
- - Login and play
B. Not so easy: (not working for Forge #780 and #781)
- - Use the official launcher to download and start once Minecraft 1.6.2.
- - Use the Forge installer to install Forge
- - Go to the minecraft base folder (the official launchers shows it when you click “Edit Profile” as “Game Directory”)
- - Go in subfolder “Versions”
- - Go in subfolder “Forge9.10.X.Y”
- - Copy the files from the Cartographer ZIP file to “Forge9.10.X.Y.jar” as usual (you can use the 1.5.2 instructions for this) and remove the META-INF folder from “Forge9.10.X.Y.jar”.
- - Start the official launcher
- - Select profile “Forge”
- - Click “Edit Profile”
- - Select the checkbox “JVM Arguments” and in the field next to it add
- “-Dfml.ignoreInvalidMinecraftCertificates=true -Dfml.ignorePatchDiscrepancies=true” (Leave a space after anything that was already there)
- - Click “Save Profile”
- - Click “Play” or “Login” to start the game. If only “Play Offline” is available, then log out and log in again to fix it.
Installation for MC 1.5.2 and older
- Extract the content of the file to your minecraft.jar
- Delete META-INF folder

Developer: MelAlvarado
Download Cartographer Mod for Minecraft 1.6.2:
For Minecraft 1.6.2
Cartographer Mod 1.6.2
For Minecraft 1.6.1
Cartographer Mod 1.6.1
For Minecraft 1.5.2
Cartographer Mod 1.5.2
For Minecraft 1.5.1
Cartographer Mod 1.5.1
For Minecraft 1.4.7
Cartographer Mod 1.4.7


![Minecraft Bubbly Blocks Texture Pack [1.6.2/1.6.1]](http://www.img.8minecraft.com/2013/08/Minecraft-Bubbly-Blocks-Texture-Pack-1.jpg)
![Minecraft Mariocraft AllStars Resource Pack [1.7.4/1.7.2/1.6.4/1.6.2]](http://www.img.8minecraft.com/2013/02/Mariocraft-AllStars-Texture-Pack-for-Minecraft.jpg)
![Minecraft OzoCraft Resource Pack [1.7.4/1.7.2/1.6.4/1.6.2]](http://www.img.8minecraft.com/2012/12/Ozo%E2%80%99s-Texture-Pack-1.jpg)
![Minecraft StrongestCraft16-64 Resource Pack [1.6.4/1.6.2]](http://www.img.8minecraft.com/2013/05/Minecraft-StrongestCraft64-Texture-Pack.jpg)
![Minecraft ShowMonsters Mod [1.6.2/1.6.1/1.5.2/1.5.1]](http://www.img.8minecraft.com/2013/09/Minecraft-ShowMonsters-Mod.jpg)


0 comment